Black Powder Golf Ball Mortar (October 24th, 2009)
My little desktop cannon is pretty fun, but it just doesn't cut it anymore. I've got an uncle in Idaho who has a neighbor that made a mortar that shoots bowling balls. I thought this was quite awesome so I set out to build a scaled down version for golf balls. Not only is this cheaper, but also carries less risk of blowing myself to smithereens. I did a lot of research to find the right metal and tried and true rules of thumb so my mortar wouldn't blow up on me. There's a good forum at http://www.go2gbo.com/forums/index.php?board=88.0 that's full of information on cannon building.
My little desktop cannon is pretty fun, but it just doesn't cut it anymore. I've got an uncle in Idaho who has a neighbor that made a mortar that shoots bowling balls. I thought this was quite awesome so I set out to build a scaled down version for golf balls. Not only is this cheaper, but also carries less risk of blowing myself to smithereens. I did a lot of research to find the right metal and tried and true rules of thumb so my mortar wouldn't blow up on me. There's a good forum at http://www.go2gbo.com/forums/index.php?board=88.0 that's full of information on cannon building.

Here are the dimensions of the piece:
Barrel (DOM Seamless Tubing)
5-1/2" long, 3/4" wall thickness, 1-3/4" inside diameter
Plug (1018 Cold Rolled Round Bar)
1-3/4" long, 1-3/4" diameter
Trunion (1018 Cold Rolled Round Bar)
5-1/2" long, 1-1/4" diameter
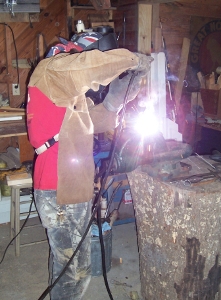
I chamfered the inside of the barrel and the outside of the plug to get a good weld. The plug was shrink fitted into the barrel and stick welded by a friend who's starting a custom offroad truck shop. Even an hour after he finished welding the barrel was too hot to pick up. Pretty impressive how thick metal retains heat.
The plug has a 7/8" deep, 3/4" diameter hole drilled into the center to act as a powder chamber. This means there is 1-1/4" of metal surrounding the chamber, which exceeds the "one caliber" rule of thumb. Mainly that means I can't put enough powder into the chamber to blow it up.
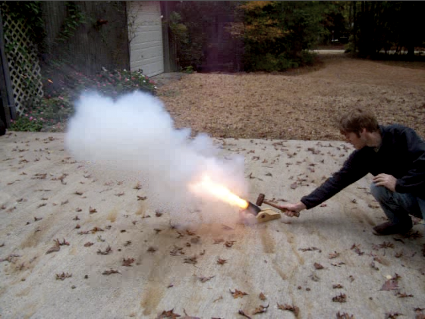
My vent is a 1/16" hole that runs from the outside of the barrel into the back of the powder chamber. I then drilled a 7/32" hole at the top of the vent and used a 1/4-28 tap to thread on a standard muzzleloading nipple. This means I can use #11 percussion caps to fire the mortar. Eventually I'll make some sort of lanyard activated, spring loaded hammer. But until then I've been firing the mortar with a 2lb hammer. :D
The plug has a 7/8" deep, 3/4" diameter hole drilled into the center to act as a powder chamber. This means there is 1-1/4" of metal surrounding the chamber, which exceeds the "one caliber" rule of thumb. Mainly that means I can't put enough powder into the chamber to blow it up.
My vent is a 1/16" hole that runs from the outside of the barrel into the back of the powder chamber. I then drilled a 7/32" hole at the top of the vent and used a 1/4-28 tap to thread on a standard muzzleloading nipple. This means I can use #11 percussion caps to fire the mortar. Eventually I'll make some sort of lanyard activated, spring loaded hammer. But until then I've been firing the mortar with a 2lb hammer. :D
Version Two (February 28th, 2010)
I made a number of improvements to my golf ball mortar over the winter. I finally got a metal lathe so I turned down the outside a bit to make it look better. Next I made a new mortar bed out of a dead maple tree I cut down for a neighbor. It was a fairly small tree, only 6-7 inches in diameter. I debarked the trunk and let it dry for about 6 months. Then I used the joiner and planer to get 3 sides square and then ripped a few 1-1/4" boards with the table saw. Then I planed my boards down to 1" and rebuilt the sled I'd made originally. The final improvement was to use 4 sections of 5/16" threaded rod to hold it all together, and I used square nuts to give it a historical look. The mortar feels much more solid and it looks a lot better. Once it warms up some I'll stain it.

 |
|